Category Archives: Computer Tips

Computer Keyboards

History of Computer Keyboards

Computer keyboards are a typewriter style device which uses an electrical switch to record the key hit. They developed from the typewriter via teleprinters and keypunches. In the early 1870’s teleprinter like devices were used to transmit stock market data from the keyboard to stock ticker machines. The teleprinter was developed in 1910 by an American engineer Charles Krum. From the 1940’ to 1960’ typewriters were the main means of data entry and output for computing environments which then developed in the 1970’s into computer terminals which included the VDU (Visual Display Unit) which has become the modern computer screen or monitor.

The keyboard remained the primary interface to the computer world, well into the era of personal computers until the introduction of the mouse in 1984. Computer keyboards still remain central to human to computer interaction to the present day.  They are even used on the latest smart phones and tablets, though they do use a virtual keyboard with these touch screen devices.

Computer Keyboard Layouts

English Computer Keyboard Layout

The layout of computer keyboards in the English speaking world is based on the American QWERTY design which came from the old mechanical typewriters. This layout was designed as a compromise by the inventor American Christopher Sholes. The compromised was made due to the mechanical limitations of the mechanical typewriter so that the arms (which held the letters and other characters) would not get stuck together when a fast typist used it. This layout is the default for Windows, Mac and Linux.

Europe Computer Keyboard Layout

The QWERTZ layout for computer keyboards is widely used in Germany and much of central Europe.  The the main difference are the two letters which are swapped and most special characters are replaced by diacritical characters. Other keyboards feature “national” layouts, so Spanish keyboards have some characters shifted to replace or include their “special characters as does Portuguese, French and other European languages. The AZERTY layout is used in France and Belgium.

Computer Keyboard Layout in Asia

Keyboards in Asia have special keys to switch between the Latin character set (which we use in English) and a completely different character system. For example Japanese keyboards can be switched between various Japanese input methods and the Latin by signalling the Operating Systems’ input interpreter to change. Similarly in the Arabic world, keyboards can often be switched between Arabic and Latin characters.

Bilingual Countries Computer Keyboards

In bilingual countries computer keyboards can often have dual characters on the keys and hence can be switched between English and the other language.

Standard Standalone Keyboards

Most standalone keyboards will be the alphanumeric keyboards which include letters, numbers and punctuation keys, usually with a separate keypad. Many keys have dual functions depending on when a “modifier” key is held down when the “normal key” is depressed. A modifier keys are special keys that modify the normal action of another key when the two are pressed together. For example holding the Shift key and depressing the letter a key gives a capital A. The other modifier keys include and not limited to the Ctrl, Alt and Fn keys.

On the Apple computers their keyboards include the Option and Command keys. On Windows computers there is a Windows key. Usually depressing the modifier key does nothing on its own.

Computer Keyboard Special Keys

Other “special” keys on computer keyboards are the Space bar, Esc key, Arrow keys, Page Up and Down keys, Home key, End key, Tab key, Delete, Insert, Print Screen, Pause, Scroll Lock, Num Lock, Enter, Sleep, WakeUp and Power keys. All these (and possibly more) are found on the Windows type keyboard. However, on the Apple keyboard they have the Help, Clear and Eject CD/DVD keys as well but not some of the others such as Insert, Print Screen, Pause, Num Lock, Sleep, WakeUp and Power keys.

Computer keyboards do change over time with added features or to reduce size, as on laptops, reduced features. Some of the multimedia keyboards have dozens of added or programmable keys to use. The same applies to gaming keyboards. It is possible to install multiple keyboard layouts on Windows, Mac and Linux or use an external application, for people or families who have different language needs.

Some keyboards either stand alone or laptop have illuminated keyboards from within which is particularly handy for dark environments. Also many keyboards have lighted keys to make it easier to use and be reminded of the fact the Caps Lock or Num Lock is one. Many Windows and Apple keyboards have a row of Function keys numbered from F1 to F12 on Windows and F1 to F16 on Apple.

These are again special function keys and can be used with some of the modifier keys mentioned above, for example Alt F4 in a Windows environment with close the active window. Tapping F2 on booting many computers today (used often in compute repair) including laptops allows the BIOS (Basic Input Output System) to be reached. The Del key on some desktops can do the same thing. F10 or F11 on booting can change the boot disk order and so on. Each computer manufacturer seems to implement different things.

Computer Keyboard Connections

Today computer keyboards can be corded to a USB plug, wireless or Bluetooth as on many Apple computers and now the Bluetooth is used extensively with tablets and Windows computers.

Shrinking of Computer and Laptop Keyboards

There is a vast range of keyboards to suit most preferences and many now have less travel difference to assist with typing, being reduced from 4.75mm to 2.79mm. Some keyboards still ”click” therefor giving an audible and physical feedback to the user.

Laptop Keyboard Repair

If water of any other fluid is spilled on the keyboard the logic board underneath can get damaged and therefor needs to be replaced. As they are basically a sealed unit this generally necessitates a new keyboard which can be expensive with a laptop as each keyboard differs from manufacturer to manufacturer and model to model of laptop. Also the fitting of laptop keyboards can be time consuming as inevitably the laptop has to be dismantled completely, therefor adding to the cost.

Keep your Keyboard Clean!

Finally, correct use of the computer keyboard is required so that physical injuries such as carpal tunnel syndrome and repetitive strain injury do not occur. Correct seating and height of the keyboard is key (no pun intended) here. Some computer keyboards, particularly shared keyboards have been found to contain more harmful germs than a toilet seat and pathogens such as the common cold, flu and other such diseases are easily spread.

Information Source

This blog has was written by Affordable Computer Repairs and Service who have seen more computer, laptop, iMac, notebook keyboards then they wish they had….

computer keyboards

Easy Way to Use Teamviewer

Easy Way to Use Teamviewer

Teamviewer is an excellent piece of software to enable a connection from your computer to another computer anywhere in the World as long as it is on the Internet. It is easy to use and easy to install.  The instructions below are clearly written for those that are looking for an easy way to use Teamviewer.

Version of Teamviewer

Before starting, both computers must have the same version of Teamviewer on them. Older versions of Teamviewer will not connect to newer version. If you try and connect and find it is not working (after checking both computers are indeed on the Internet) then uninstall the older version and download and install a newer version.

Current Version of Teamviewer

The current version of Teamviewer (April 2017) is version 12 and it can be found from Teamviewer’s website:

https://www.teamviewer.com/en/

Always go directly to the manufacturers or makers website never ever use cnet, softpedia and other such websites as they are only displaying versions you may not want.

Download Teamviewer

Download Teamviewer on both computers if not already there.

Teamviwer states: “It’s free for personal use or as a trial version for business users”. So if Aunty May or Grandma needs the occasional assistance, don’t jump in the car but use Teamviewer instead.

Teamviewer Program Screen

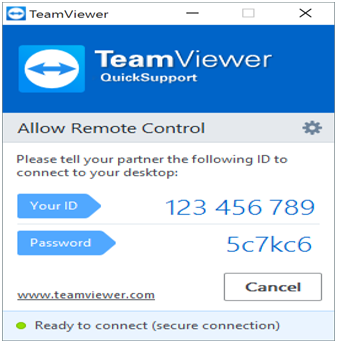
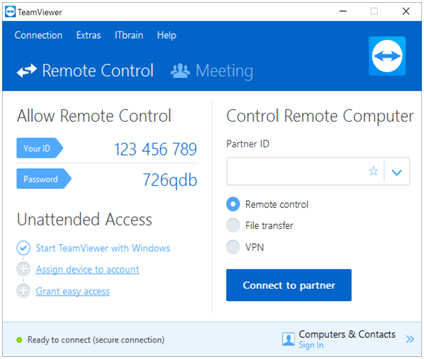
Below is the program screen you will see after starting Teamviewer. You will have an ID.  In this case the ID is 123 456 789 and password is 726qdb.

easy way to use teamviewer

Easy Way to Use Team Viewer

To communicate you need your “Partner ID” which is Aunty May’s ID. Type that in and then the program asks for the password again from Aunty May. Type that in and the program connects.

In this example Aunty May would give you the information below, which you type into your Teamviewer on your computer.

how to use teamviewer

Use Team Viewer

After connecting you can move the mouse on Aunty May’s computer and type whatever is needed. Tell Aunty May not to touch her keyboard when you are running remotely. So when the connection is made you can explain and show and run whatever is needed to be done. Anything physical such as plugging cables in etc would need to be done by Aunty May, of course.

Help to Connect to Team Viewer

I find it useful to be on the phone for all or part of the time as talking and showing helps explain things. Being on the phone for the initial connection is just about vital as an old password that you used to connect to Aunty May yesterday will not work today. The ID stays the same but the password changes often.

So there you have it, the easy way to use Teamviewer. So next time Aunty May is trying to explain something which has gone wrong with her computer in terms that make no sense at all, save your time (and temper/patience) and connect with Teamviewer instead.

how to use teamviewer 2017

How to Install an Epson Printer / Scanner (Wi-Fi)

Install an Epson Printer Step By Step Instructions

If you have just recently purchased and want to install an Epson Printer/Scanner to your computer then the information provided below will assist you.  This information is relevant and accurate as at April 2017.

This is a general article on how to install an Epson Printer / Scanner and whilst each Epson Wi-Fi Printer model is slightly different the principles are usually the same. There may be slight variances so the first step is to go to the Epson website and look for your printer’s model number.

For the purposes of this article I will use the Epson WF-4630 model as the example for how to install an Epson Printer.

Step By Step Instructions

In a browser (Chrome, Firefox, Edge, Internet Explorer) type in: “download Epson wf-4360 software” (without the “ quotes) and click on the relevant link.

In our example I have used the Epson Australian website: https://www.epson.com.au/products/multifunctional/WorkforcePro_WF-4630.asp

Make sure the picture shown relates to your Epson Wi-Fi Printer.

Go to the “Downloads” tab and pick the Operating System (OS) that corresponds to what you have.

If you are not sure what your OS is then for Windows click on the Windows Globe or the 4 square image on the Task Bar (usually bottom left of your screen). Type in “msinfo32” (without the quotes) and hit return. This will show the “System Information” and so then look for “OS Name” and then look for “System Type”. OS Name will be your OS and System Type will be x64-based or x86. The first is 64bit the second 32bit, this is important as you need to download the correct software.

For Apple Mac computers click on the Apple symbol (top left) and your OS will be displayed (such as 10.10.5).

Once you have decided which OS you have, then click on the relevant item on the Epson website. Using Windows 7 64-bit Edition as an example you are presented with something like a dozen software packages.  Basically the ones you want to setup printing and scanning are at the top, stating “Printer Driver” and “Scanner Driver”. The other one I would download is the “EpsonNet Config Utility”. This discovers your Epson printer and configures it to your Wi-Fi network.

After downloading all 3 make a note of each download by name as to which is which as it is not always obvious when looking for them in Downloads directory.

The first one to run is the EsponNet Config Utility as this will find and discover your Epson Printer so make sure the unit is on and ready to go.

Connect the Epson Printer to Wi-Fi

You can connect the printer manually if you know how or you can let the above software find it for you. So run the utility software and find your printer. You may be prompted for the Wi-Fi password so have that ready. An Icon may be put on the Desktop, if not the go to Start, All programs and find the EpsonNet Utility. Run the program to wirelessly (network) connect the Epson.

Install Printer Driver

Next, after the successful running of the Utility you want to run and install the Printer Driver. So do that. Towards the end of the install the software can prompt to print a test page so I would do that, to make sure all is working.

The third package to run is the Scanner Driver software so again run it until it is finished.

By now you will have installed all the software for general use and will have at least an Epson Scanner Icon on the Desktop.

The Trick in How to Install an Epson Printer / Scanner

The reason why this article has been written on ‘How to Install an Epson Printer / Scanner” is because whilst this should not be a difficult process – there is actually a catch or trick that if you don’t know about can mean total confusion and a very timely exercise…

This information that helps you easily install an Epson Printer / Scanner is provided below.

Firstly if you Double click the scanner Icon on the Desktop this will probably result in an error message “Cannot communicate with the scanner”. This is because although the printer has been setup as Wi-Fi, and the Scanner install appears to be for the default which is USB. Why you may ask? Who knows in this day and age?

Additional Steps Required

So again go to Start, All Programs choose Epson Scan and then “Epson Scan Settings”. Left click to run. Once open then change the name, which will be for USB, although it does not say that, to the second option which is Epson etc etc (wi-fi).  Also you may need to change the Radio Button from “Local” to “Network”.  In your installation there may be only one Epson name, so clicking the Network Radio Button may result in you having to Add a scanner.  If that is the case then when clicking “Add” the software will search for the Epson Wi-Fi unit.  Also your installation may have the option to “Test” the scanner. It would be a good idea to do so, just in case.

Another option in the Epson scanner software is a “Preferences” button being displayed. If that is the case then click “Preferences” and change the Epson to Wi-Fi or Network. As I stated above there seems to be variances in Epson models and OS therefor giving slightly different options when installing.

Once added then now when double clicking the Scanner Icon the scanner software will work correctly.  Any adjustments to scanning can now be done if need be.

Summary – How to Install an Epson Printer / Scanner

I recently installed several different new Epson Wi-Fi Printer / scanners and differences were found. These were on Windows 7 and Windows 10, so the best advice I can give is take your time and read what options the software gives.

If you need assistance to install an Epson Printer / Scanner please contact us at Affordable Computer Repairs and Service in Brisbane, we are always happy to assist.

install an epson printer

How to Find a Product Key

How to Find a Product key for Your OS or Applications

There are many different ways to find a product key for operating systems or applications / computer software.

Find a Product Key for Windows

There are several programs which will find your Windows or program product keys, serial licences or install numbers so that you can reinstall the software on another computer. Microsoft doesn’t like you doing that, of course, so they are “hidden” away in the registry and hence need a specialist program to find them.

Windows Product Key Finder Program

One program that I have used to find a product key for Windows – and which is quick and can be run from a USB stick with no installation required is License Crawler by Klinzmann. This product key finder is designed to allow you to discover those “lost” keys which can be used again.

Product Key for Windows OS and Applications

Licence Crawler not only finds the Microsoft product keys for the Operating System (Windows XP, Vista, 8, 8, 8.1 and 10) but also Microsoft Office as well as other applications/programs such as Nero, VMWare etc.

How to Find a Product Key using License Crawler

Firstly download Licence Crawler from: http://www.klinzmann.name/licensecrawler_download.htm

Then copy it to a USB stick and double click the zipped file.

Then run LicenceCrawler (shown as an Application). This asks do you want to “Extract All” or “Run” or “Cancel”. You can Extract and then name a directory as required. I use the same directory name.

You can also choose “Run” if you want to. If you choose the “Run” option then several questions need to be answered if you have “Extracted All” the program runs and asks to choose button 1 or 2 or 3 to start the program. These numbers differ every time you run LicenceCrawler which is normal, it seems. Choose the number indicated, choose your language (default English) then Accept or Deny (“Accept” of course) then hit the “Search” button. Another Windows appears and then disappears in 20 seconds. Again this is normal.

LicenceCrawler is still running usually so let it finish, this can take several minutes depending on the speed of the computer and the speed of the hard Disk Drive.

Now in some instances when running LicenceCrawler an error comes back stating Run-Time error ‘339’ “Component MSCOMCTL.OCX or one of its dependencies etc etc is missing or invalid”. No problem, all you need to do is to right click LicenceCrawler (Application) and “Run as Administrator”.

Finally LicenceCrawler will report that it has found the product keys to various programs. These are the codes you need to either print out or write down to be used again. There are many combinations to this but on my computer it shows:

HKEY_LOCAL_MACHINE\SOFTWARE \Microsoft\Windows NT\Current Version =  Windows 7 Home Premium HKEY_LOCAL_MACHINE\SOFTWARE\Wow6432Node\Microsoft\Office\14.0\Registration\{ 91140000-0011-0000-0000-0000000FF1CE}  = MSDN version = Office 2010 (Office 14.0) product codes. Your computer will of course be different.

Find A Product Key Using Magical Jelly Bean

There is another program I use is called “The Magical Jelly Bean” which can be obtained from here: https://www.magicaljellybean.com/keyfinder/

Magic Jelly Bean is another great free program which does need to be installed for it to work.

Installation only takes a few seconds and it is faster to produce the “product keys” than LicenceCrawler.

This program may not work with Windows 10 as the website states up to Windows 8.

Magical Jelly Bean do offer a paid version “Recover Keys” for US$29.95 which may assist in other product keys being found and saved.

Check Emails, Sales Dockets etc For Product Key

Another way to find a product key is from your emails, receipts and sales dockets but this is time consuming and the information is not always there anyway.

Recommendation

When trying to find a product key for an operating system or applications it is recommended that you try both of two products (LicenceCrawler and The magical Jelly Bean) or either and save those licence keys for future use.

find a product key

SSD Care – 7 Things Not to Do with a SSD

Seven Things Not to Do with  Solid State Drive (SSD)

Difference Between SSDs and HDDs

In order to understand SSD care and why certain things should not be done to an SSD it is firstly necessary to understand the difference between SSDs and HHDs.

Hard Disk Drives (HDDs)

Up until about 5 years ago the majority of Hard Disk Drives (HDD) were just that, an actual metal disk in a “mechanical” drive casing.  Some were 3.5 inch generally in desktop computers and the others were 2.5 inch in laptops/notebooks.  Both worked the same.  Both were also made to last approx. 5 years before something went pear-shaped.

Mechanical drives had 2 motors to (a) spin “the disk” and (b) to move the heads in and out to pick up data from the blocks on the disk.  Also a PCB (Printed Circuit Board) told the disk what to do and communicated with the motherboard in the computer through a cable connection.

Solid State Drives (SSDs)

Today more and more computers of both laptop and desktop configuration have a SSD or a combination of SSD and mechanical HDD.  SSD’s are fast approx. five (5) times as fast as a mechanical HDD.  The operating system (Windows, Apple OSX etc) do not really differentiate between the different drives but in a lot of ways they do.  They all show the file systems the same as with a mechanical drive.  Thus the user may very well not know if they have a mechanical drive or a SSD or a combination of the two.  The operating system treats the two types of drives very differently, so in terms of SSD care here is what not to do if you have a SSD.don't defrag ssd

SSD Care – What Not to Do

  1. Don’t Defrag SSD

    Don’t defrag SSD applies to Windows computers and not to Apple computers.  The storage “blocks” or areas on a SSD have a limited number of “writes” available to them.  This means when data is written to the drive each “write” is counted.  Hence over time the drive will start failing due to excessive “writes”.   Now these write figures are large, even massive numbers on the more expensive drives so it is not something to worry about.  However there is no point in getting Windows to cause more wear and tear for no good reason.  Cheaper drives have fewer “writes” available.  Defrag is a very old program from the early days when this sort of thing was important. With SSD care defrag isn’t needed and is as explained above detrimental – so if you have a Windows computer don’t defrag your SSD!

  2. Don’t Disable TRIM

    When your operating system was loaded by the computer manufacturer TRIM would have been enabled by the operating system.  What TRIM does is that it does not need to “wipe” data blocks or sectors on SSD’s when data is deleted (as in you delete a file).  With Operating Systems which support TRIM deleting a file will then really immediately delete the data in that block/sector.   Mechanical drives mark these blocks “deleted” or “available to be used again”. This is done so that they can be used again by the Operating System but don’t actually delete the data in them.  For your interest, this is how “undelete” programs work to undelete your accidently deleted files.  Operating Systems which support TRIM include Windows 7 onwards, Apple OSX from 10.6.8 and Linux from kernel 2.6.28.

  3. Don’t use a ‘Wipe’ Type Program

    You should not use a ‘wipe’ type program such as CCleaner, DriveWiper etc as with a SSD.  There is no need to remove any data (as discussed above).  If you are giving your computer to someone else and want to make sure none of your personal data is available to them – then with a SSD drive you don’t need to take any further action.  Delete the files and say good bye to that information.

  4. Don’t Install an Old Operating System on a SSD

    As detailed above the Operating Systems which have TRIM built into them should be used.  Anything earlier and there could well be issues with lost data.  Thus this could mean the SSD “dying” sooner.  In one case I saw actually slower response times from the computer with the SSD.  This brings me to not using old hardware (computers and laptops) as well.  There doesn’t seem to be a hard and fast rule here but I have seen some old hardware which does not work at all well with newer additions.  You could spend a lot of time and money “experimenting” so be warned.

  5. Don’t Try and Fill Up a SSD Completely

    Leaving some “free space” on any drive is recommended.  In fact Operating Systems generally require 10% free space, so that they can “do their thing”. With SSD’s their “write” ability is dramatically degraded if they are too full.  The way this works is like this… When there is plenty of space the SSD writes information or files to blocks.  Some of these blocks are only partially filled.  When the SSD starts to run out of space it has to then “hunt” for space and it hunts for the partially filled blocks hence the degradation in speed writing files.  A Google search of the words ‘ssd drive full slow’ will give you many articles on this phenomenon.  Basically don’t fill a SSD over 75%.

  6. Don’t have Programs Constantly Writing to Them

    Programs such as the Microsoft Office suite of programs will constantly write updates to the Drive (be it a mechanical or a SSD). T his is to “backup” your changes, additions and deletions.  This is good in one respect but it is bad for the SSD.  All these constant changes = writes to the SSD.  As we know from above writing too much = bad.  So it may be best to check on your programs and their updating/writes to your SSD.

  7. Don’t Use Indexing

    Microsoft Operating Systems do a lot (and I mean a lot) of Indexing of files, directories etc.  This is done so that information can be found “quickly” (via the Index). However, with SSD’s (as with mechanical drives) this requires a lot of reading and writing which as we know for SSDs is bad.  The reading really just takes time which could be better spent elsewhere.  There is absolutely no benefit to Indexing as a SSD can very rapidly access all files as quickly as it can anyway.  Some say having an Index to refer to could actually slow down this file search rather than speed it up.

SSD Care Conclusion

One last thing in relation to the importance of SSD Care… SSD’s are expensive and usually smaller in size (I meant GB or TB size not the physical size – which they generally are as well) than the mechanical drives. Consequently drive or disk space is at more of a premium than it might have been with your old computer. So deciding what files to store on the computer now becomes more relevant and important.  Hence why you should read our article on backups.  Only keep essential files on your SSD computer as you will find that you can quickly run out of space.  Keep especially large files such as TV shows, movies etc on an external HDD.

Affordable Computer Repairs and Service

If you require more assistance in terms of SSD care and what not to do with your SSD – or if you are thinking of using a SSD then please contact us at Affordable Computer Repairs and Service and we can endeavour to assist you in this area.

ssd care

Types of Backups 2017

Importance of Backups

There are many different options and types of backups, but firstly a quick reminder of how important backups are.

“To Backup or not to Backup; that is the question” as Shakespeare could have said if he were alive today.

There are two types of people in the world today; those that have lost data in a computer crash or had it stolen and those that WILL lose data sometime in the future.  This is said tongue in cheek but is also based upon the high volume of customers that we (Affordable Computer Repairs and Service in Brisbane) seeking our data recovery services.

Making a backup of your data to an external source is a good idea for everyone.  Now the word “data” means the following: any files that you have created, scanned, faxed, downloaded, copied from an external source (e.g. USB stick) or been emailed.  This includes any documents you have, any music (e.g. iTunes), any pictures/photos, any videos/movies and any files you have downloaded (generally in the Downloads directory on a Windows computer).

This isn’t an exhaustive list as you may have generated other files with a program that you use on your computer.  These include Word, Excel etc or used Picasa or Smilebox to generate collages and slideshows etc.  It is up to you to backup what you have so you need to be aware of where your files reside on your computer.  If this is too much “rocket science” then please ask for our assistance and we can assist you with this.

Types of Backups

Several types of backups are available to computer users:

  1. Backup to an external Hard Disk Drive (HDD) 2.5” or 3.5”.
  2. Backup to “the cloud”.
  3. Backup to another computer or server on the network.
  4. Backup to a DVD or USB flash drive.

Also in terms of types of backups there are manual or automatic backups:

  1. Manual backups are done by you manually copying files or directories to the backup device.
  2. Automatic backups which are performed by a software program such as Microsoft “Backup and Restore”.  These by default backs up your nominated files and directories at 7pm weekly on a Sunday night.
  3. Syncing of files from the computer to “the cloud”.

Backing Up to the Cloud

Now in terms of types of backups everyone talks about “the cloud”. What this esoteric name suggests that there is something up above our heads where data or programs or something is kept.  Not so. “The cloud” refers to the Internet and the Internet is a mass of computers all linked together.  Desktops, Servers, tablets, mainframes, mini computers and anything which is IP enabled (it has an IP address in other words).  This could be the car, fridge, phone, toaster, TV, lights and someday the dog and cat will have a chip to see where they are by GPS.  They already do this with marine animals, and land based animals to study there movements, but we digress.

Manual Backups

Manual backups are excellent as they copy each file and directory.  Thus no matter what computer you want to copy them or access them from then they can be read, opened or changed.  The different types of computers are generally different versions of Windows, Apple computers and Linux computers.  Manual backups are easy enough to complete.  The catch is you just have to remember to do them yourself.  If you need to learn how to do this then we can assist with this task.

Automatic Backups

Automatic backups are accomplished using a software package.  Most Windows (not Windows 8 or 8.1) and Apple computers have a built in software program which achieves this.  This article will not go into Apple’s Time Machine.  That is for another article on backups.

How to Use Windows for Automatic Backups

On a Windows PC in Control Panel you will see “Backup and Restore”.  Click on this and follow the prompts on-screen.  You need to tell Windows backup what Drive letter your backup device is (external HDD, flash drive, network drive etc).  Drive C: is the bootable HDD, D: maybe your DVD etc.  Once you tell Windows backup the Drive letter it will then ask if you want Windows to decide which files and Directories to backup.  You can then specify daily, weekly or monthly, different days and times depending on your choices.  I generally allow Windows to decide what files and Directories but you may want something different.  Again we can assist here.

There are other software packages too numerous to mention which achieve the same thing if you decide you don’t want to use Windows “Backup and Restore”.

Syncing Files to The Cloud

Syncing files to “the cloud”, you will need a “cloud” account such as Apple’s iCloud, Dropbox, Microsoft Onedrive or Google Drive to name the top 4.  The are many many others out there far too many to mention here.  Once you have your “cloud” account setup and you have your user_name and password written down and accessible then you will at some stage need to login to that account.

With Windows 8, 8.1 and 10 you can setup a computer login account and this will take you to Microsoft OneDrive.  Windows 8, 8.1 and 10 are OneDrive enabled.  This means OneDrive is setup and any files you “drop” or copy to that directory should mean that they are copied to “the cloud”.  This effectively means an off-site storage facility.  This is good because if you lose your computer, house and contents then at least your files (data) are somewhere else waiting to be accessed by you or a “shared” friend to access again.

I have very briefly described Microsoft OneDrive here.  There are other similar types of backup services that work in a similar fashion. However I won’t go in to here due to space.

Warning Re Syncing Files to the Cloud

No matter which “cloud” service you use be very aware that by syncing a file to “the cloud” there is a copy “off-site”.  But and this is a big but, if you delete that file on your computer it will definitely delete it on “the cloud”.  No much of a backup system then is it?  Well, what you need to do is to de-sync that directory.  Then you need to delete the file of your computer.  By doing this when the sync next happens that file deletion is not then synced to “the cloud”.  Thus your file is then not deleted.

Be warned, this sort of thing can be very dangerous as it is quite obvious a mistake can happen.  If I was you, I would backup to an external HDD first and foremost.  Only then would I suggest you experiment with the cloud syncing.

Backup Type Recommendations

What types of backup do I use? I use an external HDD, network backup to different computers and some “cloud” backup.

In terms of types of backups, whilst the cloud is considered by many to be the one and only answer, this is not in our opinion correct.  One major issue in Australia with “cloud” backup is the very slow Internet up-link speeds that are available.  Also the data caps that many ISP (Internet Service Providers) have on your account.

Be very careful that you don’t blow your data cap out of the water.  If this happens, your Internet speed could very well plummet.  Also the slow up-link speed could mean that all your pictures/photos you want on “the cloud,” could literally take weeks to up-load.  This is with the computer working 24/7.

If copying data is very important or you need to access data anywhere in the world on any computer or IP device the cloud is probably, in this writer’s opinion, the best use for this type of backup.

types of backups

PS If the horse has already bolted and you have lost data and don’t have a backup we have a Brisbane data recovery service that you may be interested in…

BSOD Help

Blue Screen of Death – BSOD Help

Has your Microsoft Windows computer suffered from the Blue Screen of Death or better know as the BSOD?  If it has then you may be fed up of the computer crashing and then rebooting, with the now familiar blue screen with white writing.  Typically the blue screen stays up for a few seconds if you are trying to write the information down or forever when you aren’t! Below is some information relating to BSOD help that you can obtain through using the BlueScreenView program.

Blue Screen of Death Help

What you can do is to download “Bluescreenview” by Nirsoft.

Once downloaded,  double click to run the program.

When run BlueScreenView will automatically pick up your minidump files.

BlueScreenView does not need to be installed onto the computer, simply run BlueScreenView.exe.

Minidump Files

What are minidump files you may well ask?  These files are created every time that Microsoft Windows Operating System crashes.  This applies to Windows versions from at least XP onwards to Windows 10.  These minidump files are generally created and stored under the following directory:

C:\Windows\Minidump\*.dmp

If your computer has crashed several times then there will be a minidump file for each occurrence with its corresponding date and time.  This means you can actually see what has happened and when and this can be useful when looking for BSOD help.

By default these “memory dumps”, for that is what they are, should be turned on by default.  However as in everything else with Microsoft Windows this is not always the case. To check to see if they are turned on you need to start “Control Panel” and go to “System and Security” then “Advanced System Settings”.  Click on the “Advanced” tab at the top of the small box.  Next click on “Settings” under the box saying “Startup and Recovery”.  With this final box opening, make sure:-

  • under “System Failure” that “Write an event to the system log” is ticked and
  • “Write debugging information” box says “Small memory dump (256KB)” and
  • the “Dump file” box says: %SystemRoot%\Minidump.

When completed click “OK” button which saves what you have changed (if that was necessary).  If no changes were made you can click “Cancel” button.

BlueScreenView Program 

Upon running BlueScreenView the program allows you to view all the minidump files created.  These are displayed individually with such information as: filename, date and time, and the basic information of what caused the crash in the first place. Details of Bug Check Code, driver information or which module caused the crash are displayed.  This is important as the driver information can point to a specific hardware driver, such as a video card driver which is to blame.  Changing the version of the hardware driver can then assist in stopping the BSODs.

A very common BSOD module problem reported is ntoskrnl.exe. This is the Microsoft Windows Operating System failing and the cause can be but not limited to:

  1. Corrupt Operating System;
  2. RAM (memory) needs checking or replacing;
  3. Windows hardware drivers are corrupted or need updating in-line with the version of Operating System you are using (running);
  4. Overclocking of the computer’s CPU

The issue is seen often with Windows 10 as Microsoft are constantly updating the Operating System (OS) and so the hardware drivers are constantly out of date and playing “catch-up”.

What are Drivers?

If you are unsure of what “drivers” (or sometimes called “device drivers) are, then they are software programs written by the hardware manufacturer of a piece of hardware.  So every single piece of hardware in the computer has a “driver” or sometimes “drivers”, as would be the case for motherboards.

The hardware “communicates” with the “driver” the “driver” then “communicates” with Operating System and so on forwards and backwards.  For example, when you hit a key on the keyboard the hardware registers that hit and the keyboard driver then communicates that information to the Operating System and it then informs the program that a key has been hit, and produces the result. Wikipedia has a far more detailed explanation for what a “device driver” is.

Conclusion

Thus as you have gathered running the BlueScreenView allows you to find out reasons and faults causing your computer to fail.  If you have experience with computer repairs this BSOD help maybe all you need to then be able to correct this problem and get your machine back up and running again.  However if you are not experienced in computer repairs you are best of providing this information to a reputable computer repair business – or speaking to them on the phone to obtain a ‘guestimate’ of likely cost of repair.

Affordable Computer Repairs and Service

We are a Brisbane computer repair business located in Coorparoo, an inner southern suburb of Brisbane.  If you live in Brisbane and need BSOD help, please give us a ring on 3397 1215.

BSOD Help

Desktop OS Market Share 2017

Desktop Operating System Market Share January 2017

Today we have Windows 10 which has been out on the market since 1st August 2015 so 18 months later let’s take a look at where it is in terms of desktop os market share according to a company called Netmarketshare.com.

By typing “Windows 10 sucks” and using a Google search engine and the program Chrome we see that there are today 1,520,000 results from our search.

Interestingly using Firefox and Google search engine the same number appears.

Even more interesting using Firefox and bing.com search engine (Bing being Microsoft’s search engine) we find the astonishing figure of 47,800,000. Mmmmm

I tried yahoo.com as the search engine and Firefox as the browser and unfortunately it seems that Yahoo cannot count as no number appeared as in the number of hits.

Just to be fair I tried duckduckgo.com and it is the same as yahoo.com it cannot count as well.

2017 Desktop OS Market Share

Back to netmarketshare.com and the results for desktop OS market share in 2017 interestingly enough are:

Windows 7 = 47.2% the clear winner

Windows 10 = 25.3%

Windows XP = 9.2%

Windows 8.1 = 6.9%

Mac OSX 10.12 = 2.75%

Linux = 2.27%

Mac OSX 10.11 = 1.7%

Other = 4.69%

The site breaks it down more finally as you can see but the major players are above.

Basically Linux has 2.27%.

Apple Mac OSX or macOS as it is now called has 6.32% market share.

Microsoft has 91.41%

Windows 8.1 and 10 Uptake

As far as Microsoft forcing Windows 10 on all Windows 8.1 and Windows 7 users very aggressively for a full 12 month period (1st August 2015 to 31st July 2016) and “updating” people overnight who then find a “Congratulations we upgraded you to Windows 10” message the next morning it would seem many people somehow dodged “the bullet”. Well done you with Windows 10 desktop market share being just 25.3%.  If you are wondering why we make this comment please read our blog on Is Windows 10 The Best Windows Operating System?

Desktop Browser Market Share January 2017

Having looked at desktop OS market share, now lets look at desktop browser market share, again as at January 2017.

Chrome = 57.94%

Microsoft Internet Explorer = 19.71%

Firefox = 11.77%

Microsoft Edge = 5.48%

Safari = 3.47%

Opera = 1.28%

Proprietary or Undetectable = 0.19%

Knoqueror = 0.01%

Android Browser = 0.01%

Mozilla = 0%

IE Still Holding Strong

Well no big surprise there with Chrome well ahead and amazingly with Microsoft wanting to kill Internet Explorer (IE) dead it comes in at number 2 and Firefox looking at losing more ground? The dreadful Microsoft Edge beats Safari somehow, I’ll never know how though. Ever tried using it? No?  Well don’t bother.

Geek Pub Speak Warning

I will relate a true story of when a tech mate (yes we Geeks meet at the pub and swap Geek Speak!) last used Microsoft Edge about 16 months ago. He related how a customer with a brand new laptop and Windows 10 wanted Chrome Browser. Using Edge he typed in two words “download chrome”…

As the story goes, just at this time the the customer asked a question just as the results appeared and he chose the first entry,  downloaded and turned to talk to the customer. Once the download finished he ran the ”Chrome Install”, or so he thought…

As he relates it, it did look different but he just thought Google had changed things – we we all relate to and know that Google isn’t likely to ring us (or you) up and tell us that they had changed their install are they? Unfortunately what he had done was selected an infected virus laden non Google program and suddenly the computer as heavily infected.  This meant that the tech had no choice but to reinstall from “factory defaults”.  This is time consuming and an hour later my mate was back to where he started.

The lesson learnt is to be super careful and whilst we all know the big companies hate each other this is really stooping very very low.

IE Is Still Available

You may not be aware that Internet Explorer is still available with Windows 10 – just look under Program Files and there is a directory called Internet Explorer. Under there is iexplorer.exe run it and pin it to your Task Bar.

Desktop Search Engine Market Share January 2017

Now having looked at both desktop OS market share and desktop browser market share, the results below are desktop search engine market shares as at January 2017.

Bing (Microsoft) = 7.15%

Baidu = 5.59%

Yahoo = 5.55%

Ask = 0.20%

AOL = 0.05%

Excite = 0.02%

No big surprise here again with Google the clear winner.

Recommendations Regarding Search Engines

I consider Ask (was Ask Jeeves) and Baidu as adware/viruses as they take you to websites that are in their own “Domain” so to speak. Basically you are not searching the whole Internet. I would advise using both with extreme caution or better still removing them as search engines. They both get “paid” to get browsing computers/people to “their” advertising web sites. They are considered as “infections” in the computer and many virus removal programs will removed them. Such a program as Adwcleaner now owned by Malwarebytes will remove them.

Affordable Computer Repairs and Service

This blog on desktop OS market share, desktop browser market share and desktop search engine market share all at January 2017 is provided by Brisbane computer repairs business Affordable Computer Repairs and Service based in the inner southern suburb of Coorparoo.

desktop os market share

Windows 10 Not Booting – Error Message BOOTMGR is Missing

If you have a problem with Windows 10 not booting you may see at some stage the following error messages:

“BOOTMGR is missing – Press Ctrl Alt Del to restart”

“BOOTMGR is missing – Press any key to restart”

“Couldn’t find BOOTMGR”

What this means is the special partition Microsoft sets up on your Hard Disk Drive (HDD) when Windows 10 is first installed has been corrupted. Hence the error message saying that the special file “BOOTMGR” is missing or corrupted.

Causes of Windows 10 Not Booting BOOTMGR Message

The causes for this can be varied but include and are not limited to the following:

  1. Windows 10 update
  2. Hard Disk Drive problems (it might mean the HDD is dying)
  3. Corrupted HDD sectors (where data is stored on the HDD)
  4. Damaged or loose HDD connectors
  5. The first boot drive (usually the HDD) is now configured to something else such as the DVD or a USB flash drive (stick)

The one I have come across the most often for Windows 10 not booting with the error message BOOTMGR is missing is the first causes listed – a Windows 10 update.

How to Fix Windows 10 Not Booting

Potential solutions to Windows 10 not booting with error message BOOTMGR is missing are provided below.

  1. Try rebooting the computer. Turn it off and wait 30 seconds then turn it on again with fingers crossed. If that doesn’t work the go to listed number 2.
  2. Check the BIOS settings. Every computer is different. A lot of tower PCs try hitting the Del key when it boots to get into the BIOS. Notebooks/laptops try F2 when it boots. Often on the screen when the computer first turns on it will say hit this key for CMOS or BIOS or Setup or words to that effect. If nothing works then use another device to Google your computer and how to get into the BIOS or CMOS setup. So for example: “Dell Inspiron 15 BIOS key” without the quotes and using your make and model of computer.
  3. Once into the BIOS look for a tab that says BOOT or something like that (again there is a multitude of options here), if in doubt try each tab along the top. A word of warning here, whatever you do do not change anything here, you are just looking. Worse case scenario hit the esc key and exit out without saving. If in any doubt stop right there and take your computer to a Computer Repair centre.  If you live in Brisbane, naturally we recommend you bring your computer to us at Affordable Computer Repairs
  4. What you are looking for is the Boot Order which should say Hard Disk Drive is first or Windows Boot Manager. Usually the latter these days. That means that Windows 10 is trying to boot from the HDD as the first and default drive.
  5. If that all looks okay then, with the power off and the power cable unplugged from the computer, try checking cables etc to the HDD. Generally speaking you can only do that with a PC Tower and it means opening up the computer. Again, if you have not done this before or you are concerned about attempting this then stop and take the computer to a Computer Repair centre. Electrocuting yourself is not worth it!
  6. At this stage the only repair option is to boot from a USB stick/flash drive or CD/DVD with a Windows 10 DVD/flash drive and repair the BOOT partition. This should then replace any missing or corrupt files (there are several) including BOOTMGR.
  7. To achieve booting from the CD/DVD or flash drive it is back into the BIOS/CMOS again and change the boot order. This was very easy to do before Microsoft with Windows 8 changed how this could be achieved using a thing called “UEFI secure boot”. Now this is hidden away forcing Windows Boot Manager as the only boot device.
  8. It is not in the scope of this article to explain every different computer manufacturer’s way of changing this in BIOS.  In fact each model of computer from the same manufacturer seems to be different every time. Bizarre but true.
  9. It is at this point where Mr. Google needs to be consulted about your computer make and model and how to achieve the boot from a CD/DVD or USB flash drive. As a general comment you need to enable legacy boot rather than UEFI secure boot as well as making the CD/DVD or USB as the first boot device.
  10. Again, if this all seems like too much rocket science for the day, then please take your computer to a Computer Repair Centre such as ours.
  11. If you can get the computer to boot from a CD/DVD or flash drive then you will need a current Windows 10 boot DVD. Boot from the DVD or flash drive and then proceed to “Repair” the computer (usually in blue and in small writing towards the bottom of the screen). Do not “Install Windows” as this will over-write your Windows on the HDD and you will lose all your files and programs.
  12. Again, if in doubt don’t fix anything that you don’t understand or if there is any doubt about losing data.
  13. Running the “Repair” as above generally “fixes” (over writes) the corrupted file or files and your computer will boot again as if nothing happened.
  14. On a reboot after repairing the BOOT area remove the DVD and flash drive so that the computer will boot on the HDD and hopefully your Windows partition. Everything should be as it was as the repair was on a different partition to your Windows 10 files are as well as your personal files.

Help with Windows 10 Not Booting

Throughout this article it has been stressed that unless you are very confident and have experience in repairing computers it is highly recommended that you take your computer to a computer repair centre if you have the problem of Windows 10 not booting with the error message BOOTMGR is missing.  The information above is as accurate and correct as possible but with the different variances between computers we do not recommend you follow the step by step advice as said, if you are not experienced in computer repair.  If you would like any further help with Windows not booting with the error message BOOTMGR please give us a call on 3397 1215 in Brisbane.

windows 10 not booting

Outlook Not Working?

Is Your Microsoft Outlook Not Working?

If you are having problems with your emails, Outlook not working properly or its slow in loading then it’s time to get to work to fix it.

Outlook is the default Desktop mail Client for most people and to them you click the outlook (Orange or Blue) button and all is well. Unfortunately Outlook needs some care and attention as it is a fairly delicate program it needs “fixing” on a fairly regular basis.

Find Your Outlook Files

Outlook creates either a .pst or an .ost file when you set it up for the first time. So somewhere on your computer there is something like an Outlook.pst file or Outlook.ost file. The names can vary depending on how it is setup, so for example it maybe your_email_address.pst or Bigpond.pst etc. The same is true for .ost files.

Now these files are by nature “hidden away in the older versions of Microsoft Office and they need to be found by you before you can fix them. In newer version of Office they are created in a Directory called “Outlook Files” (without the bunnies ears) and that can be found under the Documents Directory. So the first place to look is there.

If your Outlook.pst file or files are not there then you will need to go to the following Directory:   C:\Users\user_name\AppData\Local\Microsoft\Outlook.

The user_name above is your user_name for the computer, whatever you or someone else created when that user was first made on that computer.

To get to that directory above you need to use Windows Explorer (manilla folder icon) and start with “Computer” then “Local Disk (C:) – one click then double click Users then double click user_name.

Now of course Microsoft don’t wish you to go delving in around here so they hide the next directory called AppData. Different Windows version are of course different in where they hide the next bit which allows you to “un-hide” AppData. With Windows 7 you need to click on Tools in the Toolbar at the top. You should see File Edit View Tools Help. If you don’t then you need to click on Organise then click on Layout then tick Menu bar the Toolbar will be revealed.

Click on Tools in the Toolbar then Folder Options then View and find the Radio Button which says “Show hidden files, folders, or drives” It is by default set to “Don’t show….”

The AppData directory is now revealed.

In Windows 10, 8.1 and 8 it is of course different (thanks Uncle Bill) and you need to do the following for Windows 8 and 8.1. Open Windows Explorer then at the very top on the “Quick Access Toolbar” click on View. This shows different options so look for a square box (usually un-ticked which says “ Hidden Items” tick that box.

In Windows 10 again thanks to good old Uncle Bill you need use what they now call “File Explorer” (was Windows Explorer) and click on “This PC” on the left. Then double click (C:) – (it will be called a name_with_numbers (C:) ) and go to View as per above point 9

Outlook Fix

So now you have found where you Outlook Data Files are kept you then need to find scanpst.exe or scanost.exe.

There are many versions of MS Office 2003, 2007, 2010, 2013 and 2016 and everything is different in each of course.

To start go back to “Computer” and then “Local Disk (C:) and go to Program Files (x86) then double click on Microsoft Office. From there it may say Office 14 or some number – double click. Look for scanpst or scanost – the icon looks like a yellow envelope broken in half.

With MS Office 365 the scanpst file is under a different directory – generally C:\Program Files\Microsoft office\root\Office16

Also it does depend on whether your computer is running 32-bit Windows or 64-bit Windows. In 32-bit Windows the path would be C:\Program Files\Microsoft office\Office15 or some number – 12, 14, 15 or 16. In 64-bit computers it will be C:\Program Files (x86)\Microsoft office\Office16

Run Scanpst or Scanost 

If your Outlook is not working you can now run Scanpst or scanost.  However before you run either Scanpst or scanost you must close all open programs that you may have running..

Double click scanpst and it opens asking “Enter the name of the file you want to scan:”

Now at this point make sure that Outlook is closed and shutdown correctly not just down the bottom in the taskbar at the bottom (generally) of the screen and still active. You cannot run scanpst on an open Outlook file.

Hit browse and go to where you found your Outlook.pst file as detailed above.

Once you have done that then the “start” button goes from gray to Black and the program, starts checking 1 to 8. If errors are found it asks to repair the errors. Make sure the box which asks “Make a backup” is ticked. It is by default. Scanpst will make a backup of the file and it repairs any errors found.

This can take a while depending on several things. (a) speed of computer and general health (b) what other programs are running (c) how large Outlook.pst is.

I have seen extremely large 18GB take several hours to “fix”.

Recommendations Regarding Outlook

If you want to prevent the problem of Outlook not working we recommend you keep your Outlook.pst file as small as possible but certainly below 4GB if you can. At the very least we recommend you remove all Deleted files, Junk emails and anything else you don’t want, preferably before running Scanpst.

Affordable Computer Repairs and Service

We are a Brisbane computer repairs business based in the inner Brisbane suburb of Coorparoo.  If you need further advice or help in relation to your Outlook not working please call or email us.

outlook not working